Your Shark vacuum isn’t performing like it used to, and you’re wondering if it’s time for professional Shark vacuum repair near you. Before you start searching for repair shops, know this: many common Shark vacuum problems are fixable at home with basic tools and a little patience. Whether it’s suction loss, a clogged brush roll, or electrical gremlins, diagnosing and tackling these issues yourself can save you money and get your vacuum back in action faster. This guide walks you through identifying what’s wrong, attempting DIY fixes, and knowing when to bring in a professional.
Table of Contents
ToggleKey Takeaways
- Many common Shark vacuum problems like suction loss and brush roll clogs can be fixed at home with basic troubleshooting, saving money before seeking professional Shark vacuum repair near you.
- Clogged filters, blocked airways, and tangled brush rolls are the top causes of weak suction and can be resolved by cleaning the dust cup, rinsing filters, and removing wrapped hair from the roller.
- Always inspect the power cord for damage and listen for unusual noises like grinding or rattling, as these issues may require professional service to avoid safety hazards.
- Authorized Shark service centers offer genuine parts and warranty coverage, and professional repairs typically cost $150–600 depending on the complexity of the issue.
- Preventive maintenance—including monthly filter cleaning, weekly brush roll inspections, and prompt dust cup emptying—extends your vacuum’s lifespan to 5–7 years and reduces repair needs.
- If repair costs exceed 60% of a replacement price or your Shark is over seven years old, upgrading to a new vacuum is more economical than professional repair.
Understanding Shark Vacuum Problems You Can Diagnose at Home
Shark vacuums are durable machines, but dust, pet hair, and debris take a toll over time. Before you panic or search online for “Shark vacuum repair near me,” spend 10 minutes troubleshooting. Most issues fall into a few predictable categories that you can inspect yourself.
Start by listening and observing. Does the motor run but produce weak suction? Is the brush roll spinning slowly or not at all? Does it smell like burning plastic? Is there water damage or debris in the motor housing? These clues point to specific fixes, and tell you whether it’s safe to proceed or time to call a professional.
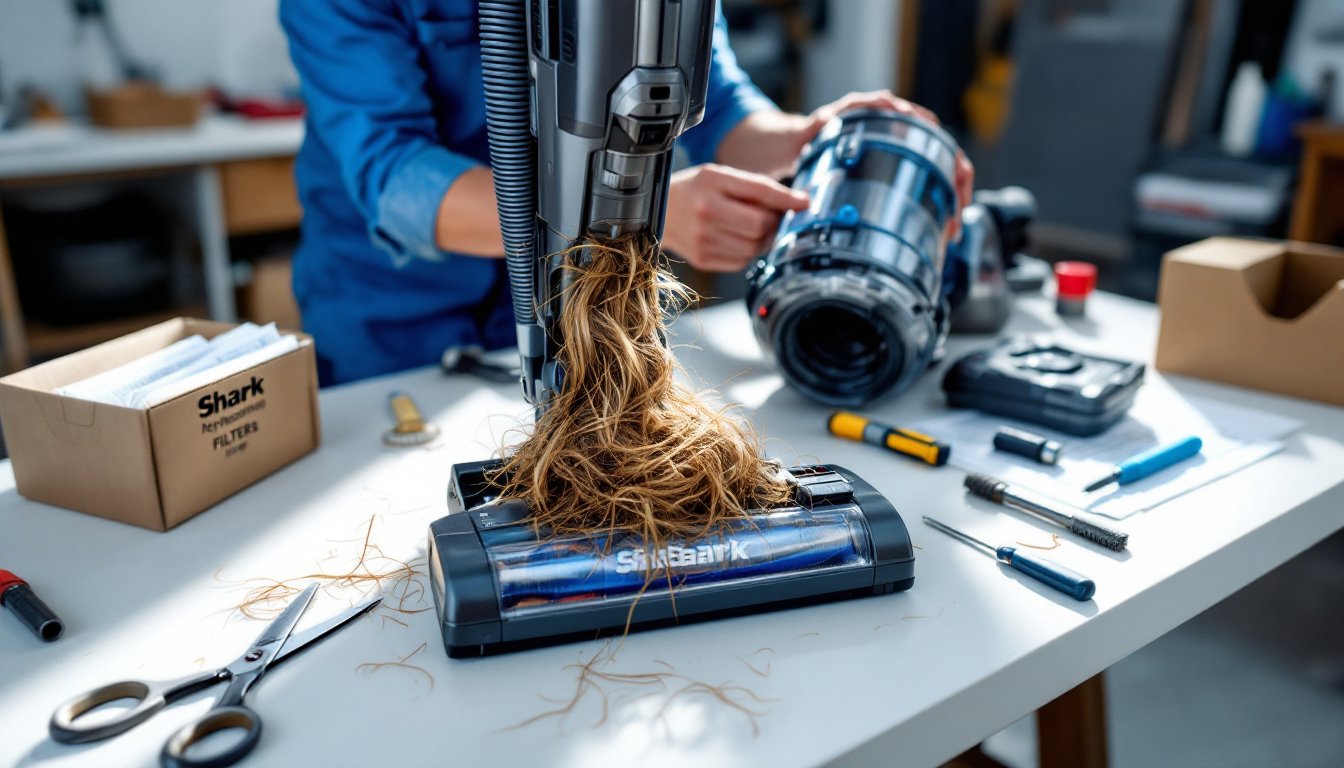
Loss of Suction and Brush Roll Clogs
Loss of suction is the number-one complaint, and it’s also the easiest to fix. The culprit is usually clogged filters, blocked airways, or a tangled brush roll.
Check the dust cup first. Remove it, empty it completely, and look inside for dense clogs or matted debris. Rinse the HEPA filter under cool water if your model has one, don’t use soap unless the manual says it’s safe. Let it air-dry completely (at least 24 hours) before reinstalling. A damp filter won’t seal properly and defeats the purpose.
Next, examine the brush roll. Turn the vacuum upside down and look at the roller’s underside. Hair wraps around the bristles like a web, restricting spin and killing suction. Use scissors or a seam ripper to carefully cut away wrapped hair. Work slowly: you don’t want to nick the bristles. Spin the roll by hand once you’re done, it should rotate freely.
Check the intake ports and hose. Detach the hose and shine a flashlight through it. You’ll often find a knotted hairball or wedged debris. A straightened wire coat hanger or plumbing snake works well to dislodge clogs. For stubborn blockages, warm water pushed through with moderate pressure helps, but let the hose dry before reattaching.
If suction returns after cleaning, you’ve won. If not, move to the motor section below.
Motor and Electrical Issues
If the vacuum runs but isn’t pulling dirt, or if it shuts off unexpectedly, the motor or power cord may be at fault. Never ignore a burning smell or sparking, stop immediately and don’t use it until you’ve identified the problem.
Inspect the power cord for cuts, fraying, or exposed wire. A damaged cord is a shock or fire hazard and requires professional replacement or a new machine. Don’t tape it up and hope for the best.
Check the thermal cutoff switch. Shark vacuums have a safety feature that shuts the motor off if it overheats. If your vacuum stops after 15–20 minutes of use and won’t restart until it cools for 30 minutes, the motor is overheating. This usually means clogged filters or airflow obstruction. Deep-clean your filters and clear all airways. If the problem persists after you’ve verified everything is clean, the motor itself may be failing, and professional service is your best option.
Listen for unusual noises: grinding, rattling, or a high-pitched whine. Grinding suggests debris in the motor housing or a damaged fan blade. Rattling often means a loose part inside. Both warrant opening up the machine, which requires skill and voids many warranties. Unless you’re confident, a technician should handle this.
DIY Fixes Before Seeking Professional Shark Vacuum Repair
You’ve diagnosed the problem. Now let’s tackle the fixable ones. Gather these tools: screwdrivers (Phillips and flathead), scissors or seam ripper, flashlight, soft brushes, and a clean cloth. Wear safety glasses if you’re opening the housing: debris can fly when the motor powers down.
Reset the vacuum. Some Sharks have a reset button (often red) on the motor or near the power cord. Press and hold it for 10 seconds. This clears temporary electrical faults. Wait 5 minutes before powering back on.
Replace the filters. If your filter is more than six months old or visibly darkened, buy a replacement. Shark filter part numbers are model-specific: check your manual or the model tag on your machine. Generic filters work but may not seal as well. Proper sealing is critical: a gap around the filter lets unfiltered air bypass the motor, shortening its life.
Clean the base plate and brush roll housing. Detach the head unit and base. Remove hair, dust, and debris with your brush and cloth. Use a damp cloth if needed, then dry thoroughly. Moisture in the housing can cause electrical problems.
Tighten loose fasteners. If you hear rattling, locate the source. Vibration from the motor can loosen screws over time. Use your screwdrivers to tighten all visible fasteners. Don’t overtighten, you’ll strip the screw or crack plastic.
Check the brush roll bearing. At each end of the brush roll, you’ll see a small bearing. These wear out and allow the roll to wobble, reducing contact with the carpet. If the brush moves side-to-side when you spin it by hand, the bearing is likely shot. Replacement bearings and brush roll assemblies are available online: installation varies by model but usually involves removing a few screws.
Finding Trustworthy Shark Vacuum Repair Services Near You
When DIY doesn’t cut it, you need a reliable repair technician. Authorized Shark service centers are your safest bet, they stock genuine parts, honor warranties, and know these machines inside and out.
Find them on Shark’s official website by entering your zip code. Authorized dealers usually offer mail-in repair and sometimes on-site service for deep cleaning or trade-in evaluations.
If there’s no authorized center nearby, platforms like HomeAdvisor connect you with vetted local repair professionals. Read reviews carefully: focus on comments about turnaround time, communication, and whether repairs lasted. A tech who takes shortcuts isn’t worth the discount.
Another solid option is checking VacServ Vacuum Cleaner Service & Sales Reviews and similar aggregators. These platforms gather customer feedback and give you a realistic sense of service quality.
Always ask upfront about diagnostic fees. Some shops charge $30–50 to examine and estimate repairs: others waive it if you proceed. Get the estimate in writing before authorizing any work. Know your warranty status: if your Shark is under warranty, an authorized service center must handle it, or you risk voiding coverage.
Budget $150–300 for labor plus parts if it’s a simple fix. Motor replacement, control boards, or major component work can run $300–600. If the repair approaches the cost of a new vacuum, replacement makes sense.
When to Repair vs. Replace Your Shark Vacuum
Here’s the hard truth: not every vacuum is worth fixing. If your Shark is more than seven years old, the motor fails, or repairs exceed 60% of the replacement cost, it’s time to shop for a new one.
Younger machines with minor issues (filters, brush rolls, cords) almost always justify repair. These components are cheap and quick to replace. A five-year-old Shark with a burnt-out motor is trickier. A new motor costs $150–250 in parts plus labor: that’s nearly the price of a solid mid-range Shark.
Consider availability of parts too. Older, discontinued models are harder to source components for, which drives up labor time and cost. Check online retailers or Shark’s parts store to see if your needed part is in stock. If you’re waiting weeks for a part, replacement may be faster.
Also think about your usage. Heavy households with pets and large homes put vacuums through the wringer. If your old Shark barely kept up, upgrading to a newer model with better suction and filtration is a smart move, not a waste.
Trusted resources like Good Housekeeping regularly test and review vacuum models, so you can compare newer Sharks to alternatives before buying.
Maintaining Your Shark Vacuum to Avoid Future Repairs
An ounce of prevention beats a pound of repair. These simple habits extend your vacuum’s life and keep it running at peak power.
Empty the dust cup after every use. A full cup chokes airflow and forces the motor to work harder. Emptying takes 30 seconds and costs nothing.
Clean filters monthly. Rinse the pre-filter and HEPA filter under cool water monthly, and replace the HEPA filter every 6 months (or as your manual specifies). Clogged filters are the number-one cause of weak suction, and they’re completely preventable.
Inspect the brush roll weekly. Quickly check for wrapped hair and remove it before it hardens and damages bristles. This five-minute habit saves you hours of troubleshooting.
Avoid wet debris. Shark vacuums aren’t shop vacs: they’re not designed for water, wet spills, or mud. If you vacuum up moisture, the motor and electrical components are at risk. Use a wet-dry vac for spills.
Store in a dry location. Humidity and temperature swings degrade electrical components over time. Keep your vacuum in a closet or garage away from direct sunlight and moisture.
Check the power cord monthly. Look for cuts or damage. A frayed cord is a safety hazard and a sign to stop using the machine.
These habits take minutes and pay huge dividends. Most Shark vacuums last 5–7 years with solid maintenance: neglected ones fail in 2–3 years.