Your dishwasher is quietly running a small miracle every cycle, and a tiny component called the float switch is doing most of the work behind the scenes. This small but critical part controls water levels inside your dishwasher, preventing overflow and ensuring proper cleaning performance. When it fails, you’ll face problems ranging from standing water and incomplete wash cycles to a machine that won’t run at all. Understanding how your dishwasher float switch works and recognizing when it’s failing can save you hundreds in repair costs and keep your dishes coming out clean. Let’s break down what this component does, how to spot trouble, and how to fix it yourself if needed.
Table of Contents
ToggleKey Takeaways
- A dishwasher float switch controls water levels by rising with the water and signaling the inlet valve to shut off at the correct height, typically 1-2 inches, preventing overflow and ensuring proper cleaning performance.
- Standing water, a dishwasher that won’t start, poor wash cycles, leaks under the counter, and unusual sounds are the main warning signs that your float switch is failing and needs attention.
- Before assuming float switch failure, check for a clogged drain or filter, test the float’s movement manually, and inspect for visible damage, mineral buildup, or corrosion in the sump area.
- Replacing a faulty float switch is a doable DIY project costing $30-$120 for the part, requiring basic tools and careful reconnection of electrical terminals, though hiring a technician is the safer option if you’re uncomfortable with electrical work.
- Monthly sump cleaning, ensuring the float moves freely, and using hard-water treatments can extend your float switch’s lifespan and prevent costly repairs by stopping mineral deposits from jamming the mechanism.
Understanding The Float Switch Mechanism
How The Float Switch Controls Water Level
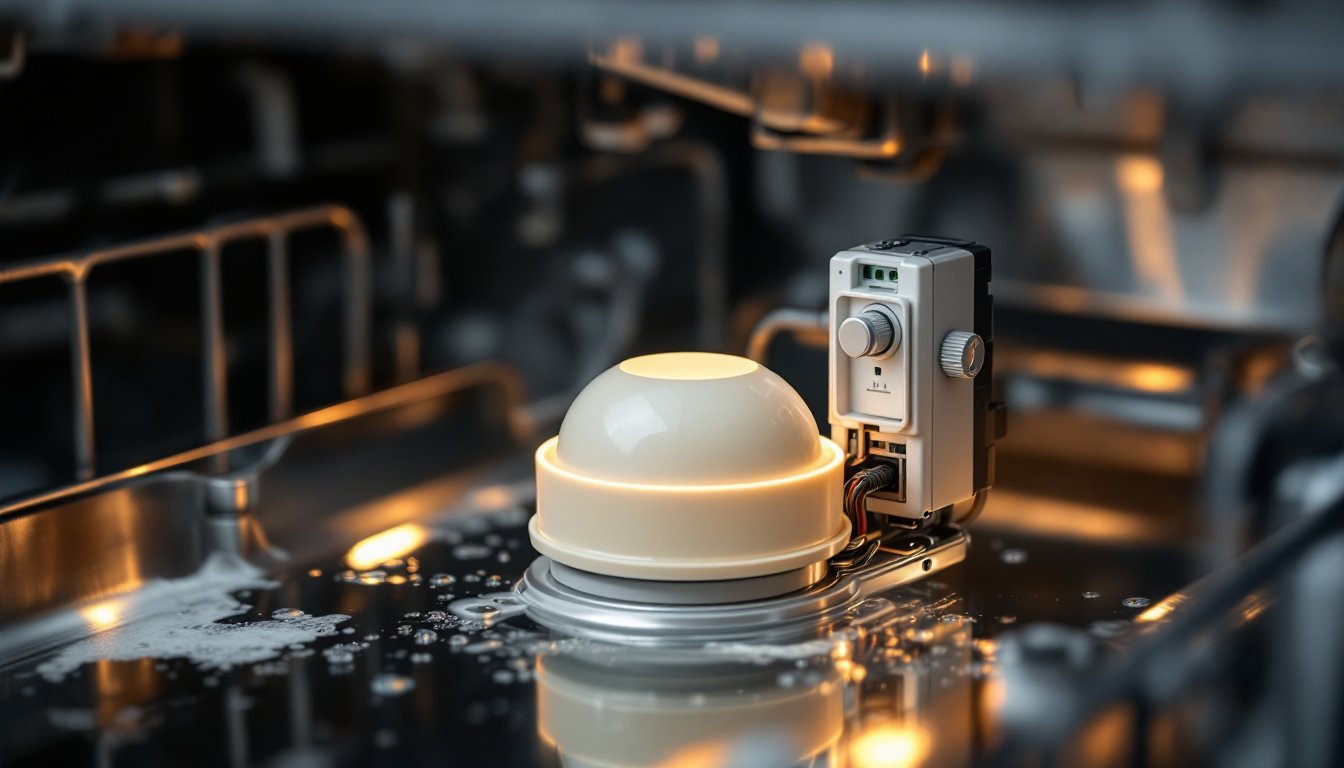
The float switch is a simple but ingenious mechanical device that sits inside your dishwasher’s sump or basin, that’s the lower chamber where water collects during operation. Think of it like the float mechanism in your toilet tank, but scaled down and purpose-built for a dishwasher’s demands.
Here’s how it works: As water enters the dishwasher during a cycle, it rises in the sump. The float (a small, hollow plastic or metal chamber) rises along with the water level. When water reaches the correct height, typically between 1 and 2 inches depending on your model, the float physically pushes up on a lever or rod connected to an electrical switch. This switch signals the water inlet valve to shut off, stopping the flow of water into the machine.
Without this mechanism, water would continue pouring in until it overflowed and damaged the dishwasher’s internal components, your cabinet, and your floor. The float switch also communicates with your dishwasher’s control board to indicate when the wash cycle should begin and when water levels are sufficient for proper operation.
The precision matters here. Most dishwashers need a very specific water level, too little and dishes won’t get clean, too much and you’re risking leaks and component damage. The float switch maintains that sweet spot automatically throughout the cycle.
Common Signs Your Float Switch Is Failing
A malfunctioning float switch shows itself through several distinct symptoms. Learning to recognize these signs early can prevent further damage.
Standing water in the tub is the most obvious red flag. If you open your dishwasher after a cycle and find water pooled at the bottom that won’t drain, the float switch may be stuck in the “open” position, preventing the machine from signaling that it’s time to drain. Alternatively, water that stays in the pump or sump area even after draining suggests the float isn’t triggering the drain cycle properly.
A dishwasher that won’t start can also point to float switch issues. Many models have a safety interlock: if the float switch doesn’t register the proper water level, the control board won’t allow the wash cycle to begin. You’ll press start, and nothing happens.
Incomplete or poor wash cycles happen when the float switch gets stuck in the “closed” position (thinking the tub is full when it isn’t). Water never reaches the correct level, so your dishes come out dirty or spotty. You might also notice the cycle runs but seems shortened or repetitive.
A leaking dishwasher under the counter can stem from an overflowing sump due to a failed float switch. If water is escaping onto your floor or into adjacent cabinets, the float mechanism should be high on your diagnostic list.
Unusual sounds during operation, grinding, humming, or the water inlet valve opening and closing repeatedly, can indicate a float switch that’s stuck or lodged, confusing your dishwasher’s control system about water levels.
Diagnosing Float Switch Problems At Home
Before you assume the float switch is bad, do some quick detective work. Many float switch symptoms are actually caused by other, easier-to-fix issues.
Start with the obvious. Check that the filter and drain are clear of food debris, grease, or buildup. A clogged drain prevents water from draining properly, which can falsely signal float switch failure. Consult your model’s manual (usually available online) to locate and clean the filter assembly and drain holes. While you’re there, inspect the sump area itself, sometimes mineral deposits or food particles jam the float, preventing it from rising and falling freely.
Manual float test. If you’re comfortable opening the dishwasher’s lower panel (and after ensuring the power is off), you can gently locate the float assembly. It should move up and down smoothly without resistance or debris. Push it gently upward, it should move without sticking. If it’s corroded, cracked, or won’t move, replacement is the answer.
Check for visible damage. Look inside the sump area with a flashlight. Cracks in the float chamber, bent lever arms, or corrosion around the switch assembly all indicate replacement is needed. Mineral buildup from hard water is common in the sump: if you see white, crusty deposits around the float, soak the area with white vinegar to dissolve them and see if the float frees up.
Consult the manual or a tech resource. Not all float switches are in the sump. Some models place them in the door latch area or elsewhere. Confirming your exact model’s float switch location (usually found by searching “[your dishwasher model] float switch”) prevents you from chasing the wrong component. Detailed troubleshooting for dishwashers with performance issues can also be found on trusted resources for dishwasher problems.
How To Replace A Faulty Float Switch
Replacing a dishwasher float switch is a doable DIY project if you’re mechanically inclined and don’t mind electrical components. But, be honest about your comfort level, if you’re uncertain, hiring a technician is the safer choice.
Safety first: Unplug the dishwasher from the electrical outlet or switch off the breaker serving it. Wait at least five minutes to ensure any residual power is discharged. If you’re not comfortable working with electrical connections, stop here and call a pro.
Gather your materials:
- Replacement float switch assembly (order the part specific to your model: costs range from $30–$120 depending on manufacturer)
- Needle-nose pliers
- Screwdrivers (Phillips and flathead)
- A small container to catch residual water
- Flashlight
- Multimeter (optional, for testing continuity before replacement)
Step-by-step replacement:
-
Access the sump. Most dishwashers require removing the lower dish rack and the filter assembly to reach the sump. Some models have a removable sump cover: others expose it directly once the filter is out.
-
Disconnect the old float switch. Using needle-nose pliers, carefully disconnect any wire terminals from the float switch. Note their positions (or take a photo) so you reconnect them correctly. Some models use a quick-disconnect: others require removing a screw or clip.
-
Remove the mounting hardware. The float assembly is typically held in place by a single clip, screw, or snap-fit bracket. Gently pry or unscrew it and lift the old float out.
-
Install the new float switch. Position the replacement exactly as the original was oriented (note the lever arm direction). Secure it with the clip or screw, ensuring it moves freely and isn’t twisted.
-
Reconnect the electrical terminals. Match the wire terminals to the positions you noted. Press them firmly into place: they should click or sit securely.
-
Reassemble. Reinstall the sump cover (if your model has one), the filter assembly, and the lower rack. Double-check that nothing interferes with the float’s movement.
-
Test. Plug the dishwasher back in and run a short test cycle (usually a 15-minute rinse cycle). Listen for the water inlet valve opening and the pump running. The cycle should complete normally and drain fully.
If the new switch doesn’t solve the problem, the issue lies elsewhere, possibly the control board or inlet valve. That’s when calling a technician makes sense. For detailed visual walkthroughs, step-by-step DIY tutorials can complement the manufacturer’s manual.
Preventive Maintenance Tips To Extend Float Switch Life
A little regular care goes a long way in keeping your float switch working smoothly for years.
Clean the sump area monthly. Every month or so (or more often if you live in a hard-water area), remove the lower rack and filter, then rinse the sump with water and a soft brush. This prevents mineral and food debris from accumulating around the float mechanism. Hard water deposits are the silent killer of float switches: in areas with high mineral content, running a dishwasher cleaner (citric acid–based products work well) monthly can dissolve buildup before it becomes a problem.
Ensure the float moves freely. Occasionally, gently press the float upward to confirm it has a full range of motion. It should rise and fall without sticking or grinding. If you feel resistance, clean the surrounding area more thoroughly or apply a small amount of food-grade silicone lubricant around the pivot point (not on the electrical contacts).
Don’t overload or cram dishes. Proper loading keeps food particles from settling in the sump and jamming the float. Follow your manufacturer’s loading guidelines: they’re not suggestions.
Rinse large food debris before loading. A quick rinse of plates removes chunky food that might fall into the sump. You don’t need to pre-wash thoroughly, modern dishwashers handle normal soiling, but large chunks of sauce or bone should go.
Use rinse aid and quality detergent. These aren’t just for clean dishes: they reduce the mineral and soap residue that accumulates in your machine over time. Better water conditions inside the dishwasher mean less corrosion on the float switch.
Know your water hardness. If your tap water is naturally hard, or if you notice white mineral buildup in your dishwasher, consider softening the water supply to your machine or running a descaling cycle more frequently. Many home renovation guides and remodeling resources discuss water quality improvements in kitchens.
Listen for changes. Unusual sounds, grinding, chattering, or repeated valve clicking, are early warnings. Catch them early, and you’ll often prevent total failure.
Conclusion
The dishwasher float switch is a small component doing essential work every time you run a load. Understanding how it functions and recognizing early warning signs of failure puts you in control of your appliance’s health. Whether you’re comfortable replacing it yourself or prefer calling a technician, knowing what to look for and what’s possible will save you time, money, and frustration, plus it’ll get your dishes clean again.