Installing a SimpliSafe doorbell might seem intimidating, but most homeowners can complete the job in under an hour with basic tools and patience. Whether you’re upgrading from a traditional mechanical bell or installing a smart doorbell for the first time, the SimpliSafe doorbell installation process follows a straightforward path: assess your existing wiring, disconnect the old unit, connect the new one, and mount it securely. This guide walks you through each step so you can add video surveillance and smart notifications to your front entryway without hiring an electrician. Let’s get started.
Table of Contents
ToggleKey Takeaways
- SimpliSafe doorbell installation takes under an hour for most homeowners and requires only basic tools like screwdrivers, a voltage tester, and a drill to complete the job.
- Turn off power at the breaker, carefully disconnect your old doorbell wires, and verify your existing 16-24 volt transformer works before connecting the new SimpliSafe unit.
- Loose wire connections cause most doorbell failures, so tighten the SimpliSafe terminal screws firmly and use electrical tape to secure wires neatly behind the mounting bracket.
- Mount the doorbell at 48 inches from the ground using a level to ensure proper horizontal alignment and clear facial recognition for your camera.
- Test the doorbell by pressing the button and checking your app for strong Wi-Fi signal and power confirmation within 30-60 seconds of powering it on.
- If you encounter damaged wiring, a missing transformer, or uncertainty about electrical connections, stop and consult a licensed electrician to avoid damaging equipment or creating safety hazards.
What You Need Before You Start
Tools and Materials Required
Gather these items before you touch anything at your door:
Tools:
- Screwdrivers (Phillips and flathead)
- Voltage tester or multimeter
- Wire strippers (if reconnecting existing wires)
- Drill with bits (for new mounting holes, if needed)
- Level
- Pencil for marking
Materials:
- Your SimpliSafe doorbell unit and included mounting bracket
- Wire nuts or terminal blocks (usually included)
- Electrical tape
- Small gauge wire (22-24 AWG) if extending connections
Most SimpliSafe doorbell kits come with everything you need. Check your box before heading to the hardware store.
Checking Your Wiring and Power Supply
Your existing doorbell runs on low-voltage power (typically 16-24 volts AC) sourced from a transformer in your electrical panel or near your furnace. Locate this transformer before starting, it’s a small metal box with two wires running to your old doorbell.
Use a voltage tester to confirm power is flowing. Turn off power at the breaker if you’re uncomfortable working live. Set your multimeter to AC voltage and touch the probes to the wires at your current doorbell location. You should read between 16 and 24 volts. If you see nothing, trace the wires back to the transformer and check there instead.
Note the wire gauge and connections at your old doorbell. Older homes sometimes have corroded or loose wiring, if the connections look questionable, plan to replace them with new wire. SimpliSafe doorbells work with standard 24-volt transformer setups, but confirm your existing system matches before proceeding. If your home lacks a doorbell transformer or you’re uncertain about the power supply, you may need a licensed electrician to install one.
Step-by-Step Installation Process
Removing Your Old Doorbell
Step 1: Turn off power. Locate your doorbell circuit breaker and flip it to off. If you’re unsure which breaker controls your doorbell, the safest move is to verify with your voltage tester. Some older homes have the doorbell on the main 15-amp breaker, so confirm before work begins.
Step 2: Remove the existing doorbell. Unscrew the mounting bracket and gently pull the old unit away from the wall. Note the two low-voltage wires connected to the back, these will either stay in place or be removed depending on your wiring setup.
Step 3: Disconnect the old wiring. If your old doorbell has wires soldered or connected with wire nuts, carefully loosen them. Take a photo of the wire positions before disconnecting so you remember which wire goes where. Label them with a piece of tape if you’re reusing them.
Step 4: Inspect the doorframe and wall. Look for rot, damage, or soft spots around the mounting area. Wood rot weakens the mounting surface and creates security vulnerabilities. If the frame shows damage, patch it with epoxy wood filler and let it cure per product instructions before installing your new doorbell.
Connecting the SimpliSafe Doorbell Wiring
Step 5: Prepare the wires. If you’re reusing existing doorbell wires, strip about ½ inch of insulation from each end using wire strippers. Ensure both wires are in good condition, if they’re brittle, discolored, or damaged, replace them with new 22-gauge wire run from your transformer.
Step 6: Connect to the SimpliSafe unit. The SimpliSafe doorbell has two terminal screws on the back labeled for low-voltage input. Loosen these screws and insert your two wires (polarity doesn’t matter for doorbell circuits, AC voltage has no positive or negative). Tighten the screws firmly: a loose connection will cause the doorbell to fail intermittently. Professionals who install SimpliSafe doorbell cameras recommend double-checking these connections because loose terminals account for most post-installation issues.
Step 7: Secure the wiring. Use electrical tape or a cable clamp to keep wires neatly bundled behind the unit. This prevents accidental disconnection and looks professional. If wires run across exterior surfaces, consider running them through conduit for weather protection.
Step 8: Power on and test. Flip the breaker back on and open the SimpliSafe app on your phone. Most units take 30–60 seconds to boot up and connect to your Wi-Fi. Follow the in-app prompts to confirm the doorbell recognizes power. You should hear a faint chime or see a light indicator. If nothing happens, turn off the breaker and recheck your wire connections.
If your existing wiring is damaged or too short, run new wire from your transformer to the doorbell location. This is straightforward, drill a hole (usually ½ inch) through the wall plate, feed the new wire through, and connect both ends to their respective terminals.
Mounting and Securing Your New Doorbell
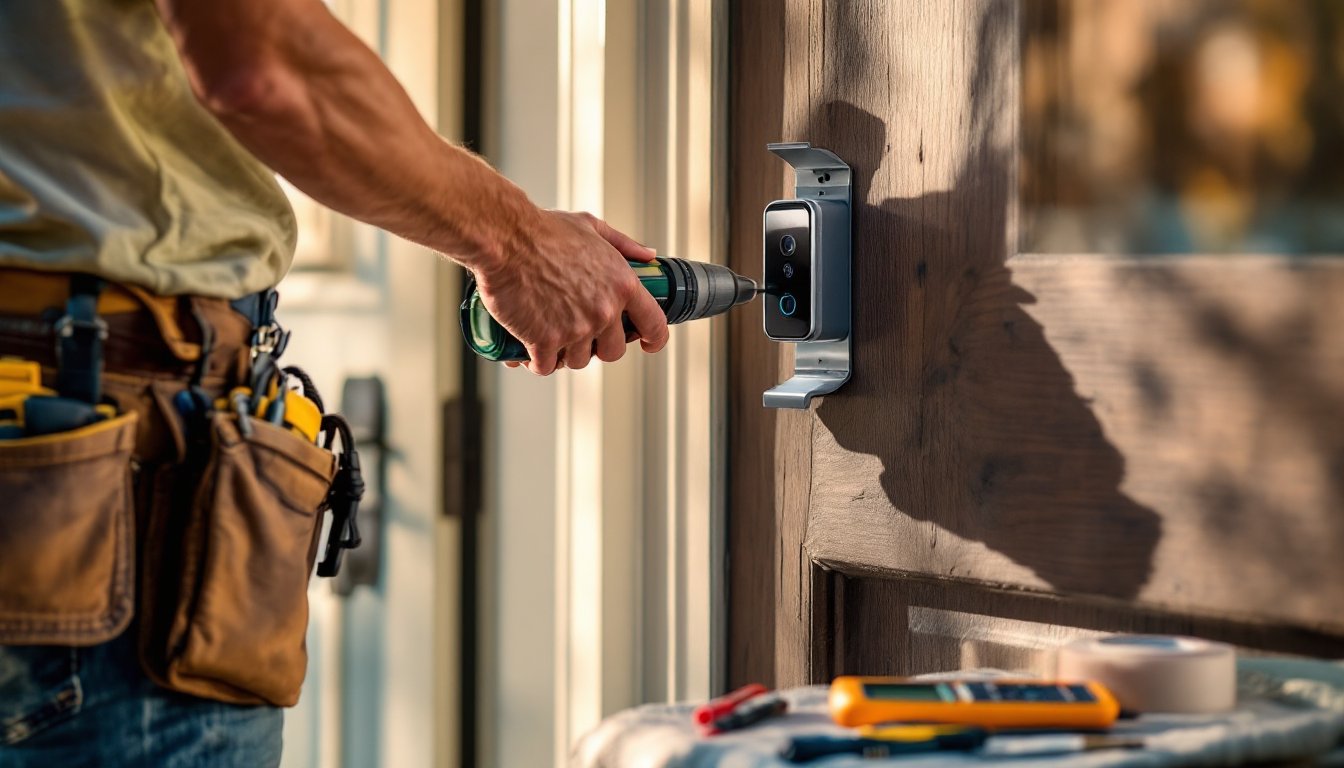
Step 9: Position the mounting bracket. Hold the SimpliSafe bracket at the desired height, typically 48 inches from the ground to the center of the doorbell. This puts the camera at eye level for clear facial recognition. Use a level to ensure the bracket sits perfectly horizontal. Mark the screw holes with a pencil.
Step 10: Drill mounting holes. If you’re not using the old doorbell’s holes (which may be misaligned), drill new ones using a drill bit slightly smaller than your fasteners. For wood, use standard wood screws: for metal trim or composite materials, use self-tapping metal screws. Pre-drilling prevents splitting and makes installation cleaner.
Step 11: Secure the bracket. Attach the SimpliSafe mounting bracket with the included fasteners. Tighten screws snugly, not so hard that you risk cracking the bracket, but firm enough that it doesn’t shift. The bracket should support the weight of the doorbell without sagging.
Step 12: Attach the doorbell unit. Slide or snap the doorbell onto the bracket per SimpliSafe’s instructions (designs vary by model). Ensure it’s fully seated and secured. Tug gently to confirm it won’t slip out.
Step 13: Install the faceplate and any accessories. If your model includes a faceplate, weatherstripping, or decorative trim, attach these now. Weatherstripping is crucial for exterior installations, it keeps wind, rain, and insects out of the junction where the doorbell meets the wall.
Final checks:
- Is the doorbell level and centered on the door frame?
- Do the wires have slack inside the wall (no tension on connections)?
- Is weatherstripping snug and free of gaps?
- Does the app show a strong Wi-Fi signal?
Test the doorbell by pressing the button. You should hear a chime, see a notification on your phone, or both (depending on your settings). If the button feels stiff or stuck, don’t force it, contact SimpliSafe support before proceeding.
For additional detailed guidance on installation steps, professional resources like comprehensive guides on how to install SimpliSafe doorbell cameras break down each phase with visual aids. Installation typically takes 20–45 minutes depending on your existing wiring condition and comfort level. If you encounter damaged wiring, a missing transformer, or any uncertainty about electrical connections, stop and consult a licensed electrician, doorbell circuits run low voltage, but improper work can damage expensive smart home equipment or create safety hazards.