Water softener resin is the engine of your entire system, it’s the material that grabs hard minerals like calcium and magnesium right out of your water supply. Over time, this resin gets tired. It stops working as well, and your water starts feeling harder again. The good news? Replacing water softener resin is a straightforward DIY job that most homeowners can handle in an afternoon without calling a pro. You’ll save a few hundred dollars and gain real knowledge about how your system actually works.
Table of Contents
ToggleKey Takeaways
- Water softener resin replacement is a DIY-friendly process that most homeowners can complete in an afternoon while saving several hundred dollars in professional service fees.
- Signs that water softener resin needs replacement include hardness breaking through your water, dark brown or black colored beads, and rotten or sulfurous smells from the mineral tank.
- Proper water softener resin replacement requires the correct resin type (typically 8% cross-linked cation resin), thorough tank rinsing with distilled water, and a manual regeneration cycle to condition the new resin.
- Common mistakes like using the wrong resin type, overfilling or underfilling the tank, and skipping the rinse step can significantly reduce system performance and waste money.
- Most residential water softener resin lasts 10 to 15 years, and maintaining a clean brine tank with proper salt levels ensures optimal regeneration and extends the life of your replacement resin.
- Always consult your system’s manual to confirm the exact resin volume, type, and valve configuration before starting replacement to avoid costly errors.
When to Replace Your Water Softener Resin
Most water softener resin lasts somewhere between 10 to 15 years, depending on your water quality and how often your system regenerates. But you don’t need to wait until year 10 to check whether it needs replacing.
The telltale sign is hardness breaking through: your water starts feeling slippery again, soap doesn’t lather well, and you notice scale buildup on faucets or shower heads even though the softener is running. Another clue is color. Open your brine tank and look down at the resin beads at the bottom of the mineral tank. Fresh resin is typically golden or amber-colored. If it looks dark brown or black, it’s either fouled by iron or other contaminants, or it’s simply exhausted.
You can also run a water hardness test using an inexpensive test kit (hardware stores carry them for under $10). If you’re reading hardness levels that your softener should’ve eliminated, that’s your cue. Some newer systems have diagnostic displays that flash warnings, so check your manual first.
One more signal: if your resin smells rotten or sulfurous when you open the tank, you’ve got bacterial growth or iron fouling. This is common in areas with high iron content or after long periods of non-use. Replacement is the cleanest fix, though you can sometimes rejuvenate resin with specialized cleaning compounds if the issue is light fouling.
What You’ll Need Before Starting
Materials:
• Replacement resin beads (cation exchange resin, typically 8% cross-linked polystyrene: buy the exact type and amount for your tank, usually 1 to 2 cubic feet for residential systems)
• Table salt or brine pellets for regeneration after replacement
• Distilled water or deionized water for rinsing (tap water can introduce minerals)
Tools:
• Flathead screwdriver (for removing the mineral tank’s top assembly)
• Bucket (5-gallon capacity minimum)
• Shop towels or rags
• Wet/dry vacuum or pump (optional but recommended for emptying the tank quickly)
• Water softener resin removal tool or a small mesh basket (some systems include one: DIYers improvise with a slotted spoon or strainer)
PPE:
• Work gloves (nitrile or rubber, resin can irritate skin)
• Safety glasses
• Respiratory mask if you’re sensitive to dust (bagged resin generates fine particles)
Before you start, locate the manual or contact the manufacturer to confirm your system’s resin volume and type. Cation resin (for standard water softening) comes in different cross-link percentages: 8% is standard for household systems. Buying the wrong type or volume wastes time and money. Also, check whether your system has a valve assembly on top or a cartridge design, this affects how you access the resin.
Step-by-Step Resin Replacement Process
Draining and Preparing Your System
Start by turning off the water inlet valve to your softener. If you can’t find it, shut off the main water supply. Next, open a nearby faucet to release pressure from the lines. This prevents messy surprises when you open the mineral tank.
Flip your system to “bypass” mode (usually a knob or lever on the valve head) so water skips the softener entirely while you work. This protects you from accidental water flow during disassembly.
Unscrew or unlatch the mineral tank’s top assembly. Some systems use four bolts: others have a clamping ring. Work slowly, you may encounter a little remaining pressure or water. Have a bucket ready. Once the top is off, you’ll see the resin beads and the internal distributor tube. Drain any remaining water from the tank using your wet/dry vacuum or by tilting and pouring carefully into a bucket.
Removing the Old Resin
This is the messiest part, resin beads are tiny and slippery. Use a mesh basket or slotted spoon to scoop out the old resin in batches, placing it into a bucket. You can dispose of used resin in your regular trash (it’s not hazardous), though some water treatment suppliers accept it for recycling.
Once most of the beads are out, rinse the tank thoroughly with distilled water. Pour water in and slosh it around to clear dust and debris. You want the tank clean before fresh resin goes in. Check that the distributor tube (the pipe running down the middle of the tank) is intact and not cracked. If it’s damaged, replacement is necessary before you refill, a damaged distributor causes channeling and poor resin contact.
Drain the rinse water completely. A wet/dry vac speeds this up significantly.
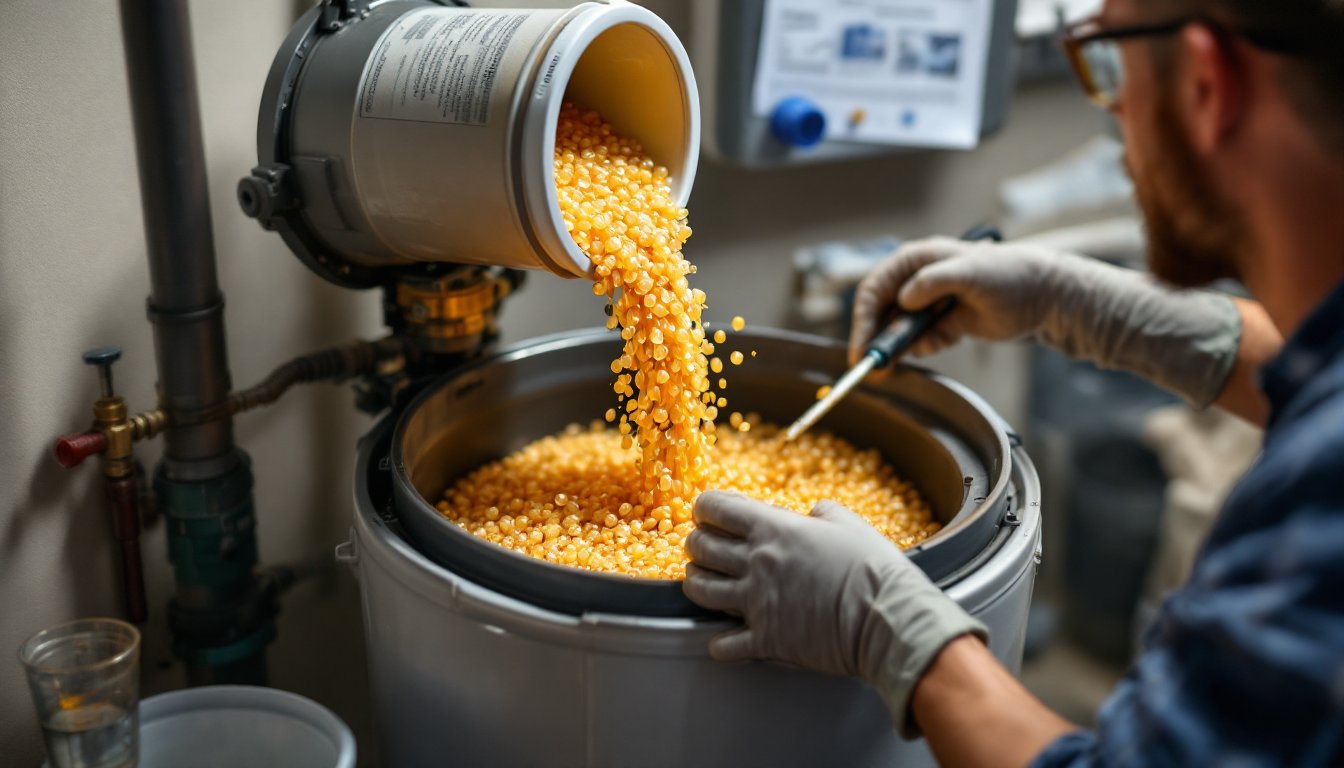
Installing Fresh Resin
Carefully pour your new resin into the tank. Manufacturers typically sell it in bags: pour slowly to avoid creating a dust cloud and to let beads settle evenly. If the tank is tall, this takes a few minutes, don’t rush. Fill to the level recommended in your manual (usually about 2 to 3 inches below the top of the mineral tank).
Once the resin is in, add a measured amount of distilled water, typically about 1 gallon per cubic foot of resin. This helps the beads settle and prevents air pockets. Gently swirl the tank (you can pour water in and out slowly to mix without disturbing the distributor) until the beads are evenly suspended.
Reassemble the top assembly, making sure the distributor tube is centered and the seals are tight. Hand-tighten bolts or clamps first, then use a wrench to snug them, don’t over-tighten, as you can crack plastic housings.
Turn the water inlet valve back on slowly. Your system may flush some resin dust through the lines initially: this is normal. Let water run through the softener for a few minutes (stay in bypass mode) to clear air.
Switch from bypass back to normal softening mode. Run a manual regeneration cycle (consult your manual for the button sequence or lever position). This backwashes the fresh resin, removes residual dust, and conditions the resin with brine. The whole cycle typically takes 1 to 2 hours. Add salt to your brine tank if needed.
Common Mistakes to Avoid
Using the wrong resin type. Cation resin works for standard water softening: anion resin is for iron or nitrate removal. If you buy anion by mistake, it won’t work and you’ve wasted money. Always double-check your manual or ask the supplier.
Overfilling or underfilling the tank. Too much resin blocks water flow and reduces efficiency. Too little leaves the water untreated. Follow your manufacturer’s specification exactly. Many problems homeowners blame on resin failure actually trace back to incorrect volume.
Skipping the rinse step. New resin carries dust and sizing agents. If you don’t rinse thoroughly, you’ll see cloudiness or particles in your water for weeks. Rinse until the rinse water runs clear.
Not regenerating after replacement. A fresh regeneration cycle conditions the resin and removes air. Skipping this step leaves your system underperforming until the first automatic cycle.
Forgetting to add salt to the brine tank. Your resin can’t regenerate without salt. After replacement, check the brine tank level and top up if needed. Some systems use brine pellets: others use granular salt. Don’t mix types, stick with what your manual specifies.
Failing to clean the brine tank. While you have the mineral tank open, peek into the brine tank (if it’s exposed or accessible) and look for salt bridges or sludge buildup. Old salt can form a crust that prevents proper brine delivery. A quick rinse of the brine tank improves performance and extends resin life. How your system regenerates depends on consistent brine strength, so don’t neglect this step.
If you’re working on an older system or one with a complex multiport valve, reviewing DIY repair tutorials and home maintenance guides before you start can save headaches. Water system complexity varies, and some configurations benefit from a second pair of hands or even a professional touch if you’re unsure.